UI Quick Start
Developing a User Interface (UI) using ASP.Net
For a video tutorial of the information presented in this section please check out Part-5 of the TagsCollector Quick Start Video series located on the TagCollector website.
Decide on a development workstation
For creating a user interface (UI) a development computer will be required. This development computer can be either the production server hosting the TagsCollector service, or it can be a completely separate workstation. As a general rule, if the development system will only be used for supporting one TagsCollector installation, then utilizing the server for development is often the best solution. However, in situations where multiple TagsCollector installations will be remotely supported, then a separate workstation may be the better option.
Install Development Software
Once the development computer has been selected, Microsoft's Visual Studio and a software application for creating and editing graphic images will need to be installed before proceeding to the next step. For editing graphics there are many alternatives that work well, including Affinity Designer, Affinity Photo, AutoCAD, Gimp, Illustrator, Inkscape, Photoshop, and many others. Select the product that you are most comfortable working with.
Customize the ASP.Net Template Files
Download the TagsCollectorUITemplate.zip file from the TagsCollector website and extract the files into a working directory on the development computer. Note: If you are using the server for UI development, then you have likely already completed this process back in Step-9 of the TagsCollector Quick Start. Once the files have been extracted, open the folder and double click on the TagsCollectorUI.sln (solution) file. If Visual Studio is properly installed, then this should open the template project inside the integrated development environment (IDE). This document assumes that you already have a basic understanding of the Visual Studio IDE, so if you’re completely new to the application, it’s recommended that you become familiar with the basic structure of Visual Studio before starting on the user interface customization.
Once Visual Studio is open, examine the project files available inside the solution explorer. Below is a quick explanation of how the files are utilized by the system.
The files shown in Green are the ones that will need to be edited and customized. The files shown in red should under normal circumstances not be modified or edited. Editing these files can break the system and produce unexpected or erratic behavior.
►RootPath.txt – The rootpath.txt file contains the file path for connecting the UI to the TagsCollector service. The file path should be configured exactly the same as the path set inside of the TagsCollector Management Console (see Step-3 of the TagsCollector Quick Start).
►Site.Master – This file establishes the screen layout for the site and defines each zone within the layout in accordance with the page format shown in the UI Master Page Layout. The only items in this form that may require editing are the Global tag descriptors located in the Global Tag area of the page. This space is reserved for a few select pieces of data that deserve special attention (i.e., Outside Air Temp, Facility Power Consumption, Total Production Numbers, etc.).
►Sample_Read_Write.aspx – This page is a sample content page that provides functions needed to support a graphic content page. This page can be copied and modified for quickly developing as many content pages as required.
►Sample_Animation.aspx – This page is a sample content page that provides functions needed to support an animated graphic content page. This page can be copied and modified for quickly developing as many animated content pages as required, but developing animations will require a more advanced understanding of javascript to control the sprite animations.
►Web.sitemap – This file contains the information for building the general user site navigation menu. This file will need to be customized in order to add new content pages to the site navigation menu.
►Web101.sitemap – This file contains the information for building the admin user site navigation menu (level-5) access. This file will need to be customized in order to add new content pages to the admin user's site navigation menu. This file allows the admin navigation menu to contain items that you may not want to be accessible to general users (i.e., access to the user account management page)
►Global.asax - The global.asax file contains the global variables needed for the operation of the site. By default there are two hard-coded passwords contained in this file that should either be modified or removed before installing in a production environment.
►AlarmManager.aspx - The Alarm Manager is a prewritten content page for viewing and acknowledging all of the systems active alarms and events. This form requires no customizing.
►AlarmManagerAdmin.aspx - The Alarm Manager Admin page is the same as the Alarm Manager page, but offers the added ability to enable and disable tags and alarms. This form requires no customizing.
►AlarmReports.aspx - The Alarm Reports page is a prewritten content page that provides functions for retrieving and viewing historical alarm logs. This form requires no customizing.
►Default.aspx - The Default page is a prewritten content page that is displayed behind the user login box. This form requires no customizing.
►EventScheduler.aspx - The Event Scheduler page is a prewritten content page that provides functions for scheduling events based on time and date. This form requires no customizing.
►GetDataTimer.cs - The Get Data Timer is a block of C# code for interfacing the UI to the TagsCollector service. This code requires no customizing.
►MultiGraph.aspx - The Multi-Graph page is a prewritten content page that provides functions for retrieving and graphing historical trend data. This form requires no customizing.
►RealTimeGraph.aspx - The Real Time Graph page is a prewritten content page that provides functions for retrieving and graphing real time data. This form requires no customizing.
►RecipeMgr.aspx - The Recipe Manager page is a prewritten content page that provides functions for the creation of presets that write values to multiple tags simultaneously. This form requires no customizing.
►SimpleLog.cs - The Simple Log is a block of C# code for logging warnings and errors to a file that can be utilized for diagnostics and troubleshooting software problems. This code requires no customizing.
►UserAccounts.aspx - The User Accounts page is a prewritten content page that provides functions for managing user access. This form requires no customizing.
►UserLogs.aspx - The User Logs page is a prewritten content page that provides functions for retrieving and viewing historical user activity logs. This form requires no customizing.
►web.config - The User Interface website configuration file. This form requires no customizing.
Customizing the Company Logo and Project Header
Start customizing the UI website by replacing the default company logo and header images with images more fitting for your individual project. These images will be shown on the top of the master page layout and will be highly visible to all users, so it’s important to make them look good.
Open the template file and locate the image folder, inside you will find a file named LogoMaster.svg. Using the graphics editing software of your choice, replace this file with your own company logo. The dimensions of the image should be 200px wide by 66 px high and formatted as a scalable vector graphic file (SVG). Other image types can be used, but SVG files are preferred since they can be scaled indefinitely and still remain sharp and non-pixelated.
Next, replace the file named HeaderMaster.svg with an image that is 1055px wide by 66px high. This space is normally used for the system facility name but can be used for other purposes.
Creating Content Page Background Images
The first step to developing a content page is to develop a background image for the page. For content pages these images will need to be 1055px wide and 750px high and formatted as jpg, png, or svg.
Content page background images are intended to be illustrations of physical items and are used to help clarify the data being displayed (e.g. a facility floor plan, a piping schematic, machine drawing, etc.). There is no single best way of designing them, but as a general rule, when developing graphics, it's best to avoid background images with bright colors, or colors that will make identifying the dynamic tags more difficult to see. (e.g., a bright red drawing of a machine, will make it much more difficult for users to spot a bright red data tag that’s indicating an alarm condition).
Side Note:
It is recommended that you do not dynamically rescale these images inside the website. Since we will be applying data labels over these images dynamic scaling makes it extremely difficult to position these labels accurately and drastically slows the time required for loading the page.
Configure the Project File Path Location
Using Visual Studio, open the TagsCollectorUITemplate solution file and locate the rootpath.txt file inside the solution explorer. Double click the file and set to file path to be exactly the same as the path set inside of the TagsCollector Management Console (see Step-3 of the TagsCollector Quick Start).
The default path is c:\MyTagDatabase, but this can be set to any location on the local machine.
Constructing a Content Page
1. Make a copy of the sample content page
For developing content pages most of the work is already done and only requires a few quick modifications. For rapid development, it is best to start by making a copy of one of a sample content pages, and then modify the copy. These sample pages already contain all the code needed to interface the content pages data with the rest of the system and make adding pages quick and easy.
The system includes two sample pages, the “Sample_Read_Write.aspx” page and the “Sample_Animation.aspx” page. Constructing an animated graphic involves more advanced coding skills, so for anyone new to Visual Studio and ASP.NET it is best to start with the much less complicated “Sample_Read_Write.aspx” page.
To begin the process, locate the “Sample_Read_Write.aspx” page in the solution explorer. If you expand this page, you will see that it actually contains three separate files. The primary file is the aspx markup file that creates the html web page, the second file is the aspx.cs file which contains the C# code behind for updating the data labels and handling the communications between the server and the client… and the third file is the aspx.designer.cs file which is automatically generated by visual studio and is used for linking the other two files.
To copy the sample page, it is only necessary to select the top-level file. Right click and select copy… then go up to the TagsCollectorUI folder… right click and select paste.
2. Rename the Copy
This should have created a new page called “Sample Read Write Copy” that you can now rename and modify. To rename the page, right click on the top-level file, select rename, and enter a new name to describe the new page content (For the following examples we will call the page “Machine01”). For naming pages, it is best to not use dashes or spaces in your file name. Notice that when the top-level page is renamed that the to two associated files are also automatically renamed.
3. Rename associations inside the copy
Next double-click the new aspx page and look at line 1 in the code and set the “inherits” property for the page to reflect the new page name.
Change this…
…CodeBehind="Machine01.aspx.cs" Inherits="TagsCollectorUI.Sample_Read_Write"
To This…
…CodeBehind="Machine01.aspx.cs" Inherits="TagsCollectorUI.Machine01"
Next, double click the associated aspx.cs file and scroll down to where the “public partial class” is set…
Change this…
public partial class Sample_Read_Writen : System.Web.UI.Page
{
static string pageName = "Sample_Read_Write";
To This…
public partial class Machine01 : System.Web.UI.Page
{
static string pageName = "Machine-01";
Note: the last modification made contains what the user will see. This entry can contain spaces or other characters needed to best describe the page.
This completes the changes need on the C# code behind file. You can now close this file and save the changes.
4. Replace the background image.
Once again open the top-level aspx file in the Visual Studio design window. At the bottom of this page there is an option to view the page as either source code, in a graphics design view, or in a split view. To see what the page looks like, switch to the “Design” view.
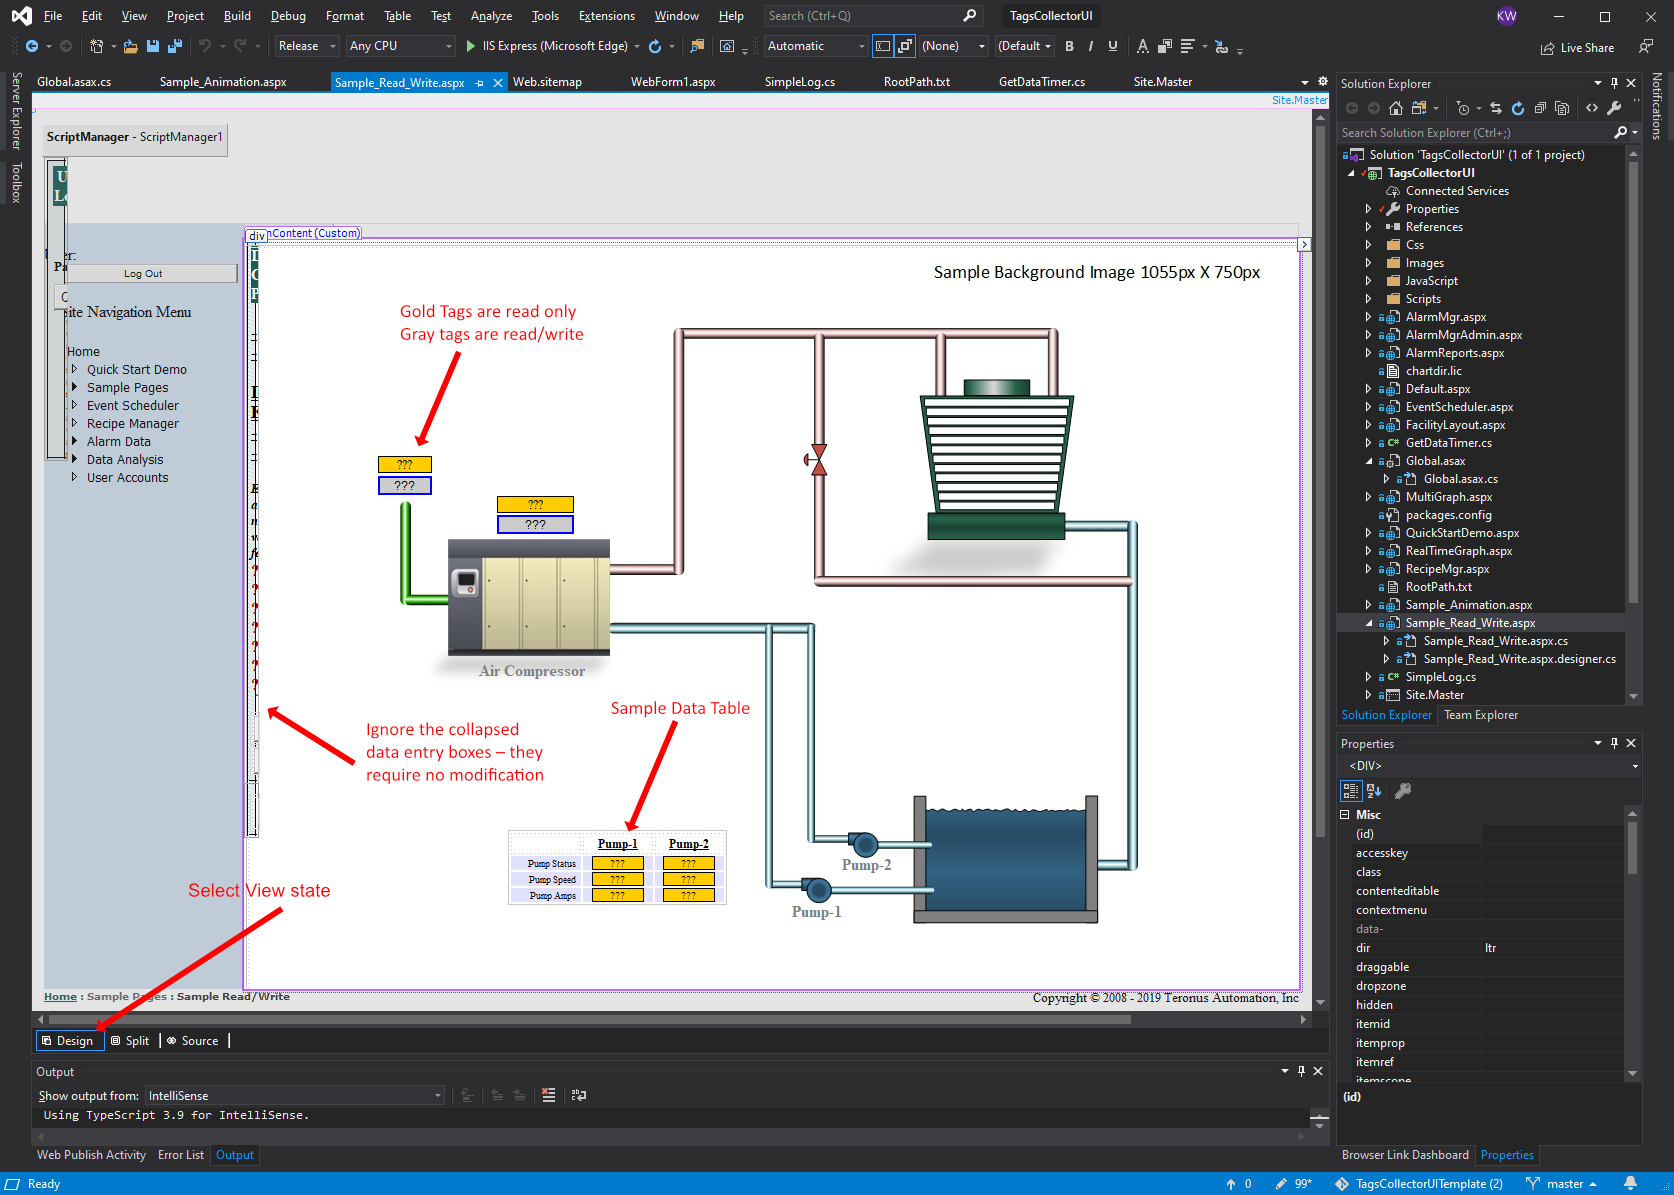
The sample content page shown above is made up of a static background graphic, with dynamic tags placed over top of the image. The golden colored tags are labels for “read only” data coming from the TagsCollector service, and the gray colored tags are buttons that both read data in AND send commands back to the service… Both the text… and the colors are ultimately controlled by TagsCollector, but the default values will be displayed anytime the tag can’t connect to the service… so it’s best to set these defaults to a color that users will quickly identify as being an error.
The first change to make will be to replace the sample Air Compressor image with your own custom background image that is 1055 wide X 750 high. Once you have an image created, you will need to save it in the projects image folder and then add it to your project by right clicking on the images folder in the solution explorer, select >Add > Existing Item, locate your image, select it, and click the add button.
Next switch back to the source view and change the background image file name (located somewhere around line number 15) to the name of the file you just added to the project.
If you switch back to the design view you should now see that the background image has been updated, but the old data tags remain.
5. Replace, Add, or Delete the read only data tags.
Switch to the design view for adding and customizing the data tags. To add a new data tag, simply click on an existing golden colored tag and select copy (Ctrl-c), next click an empty spot on the page and paste (Ctrl-v). This will now place a copy of the tag over top of the original. This copy can be clicked, moved, and resized as needed to fit your new page design.
Next for connecting the label to the actual data, all you will need to do is to click on the tag you want to connect, locate the tag’s ToolTip property inside of Visual Studio’s Properties window, and edit the text to reflect the group name and descriptor as defined in the TagsCollector manage console.
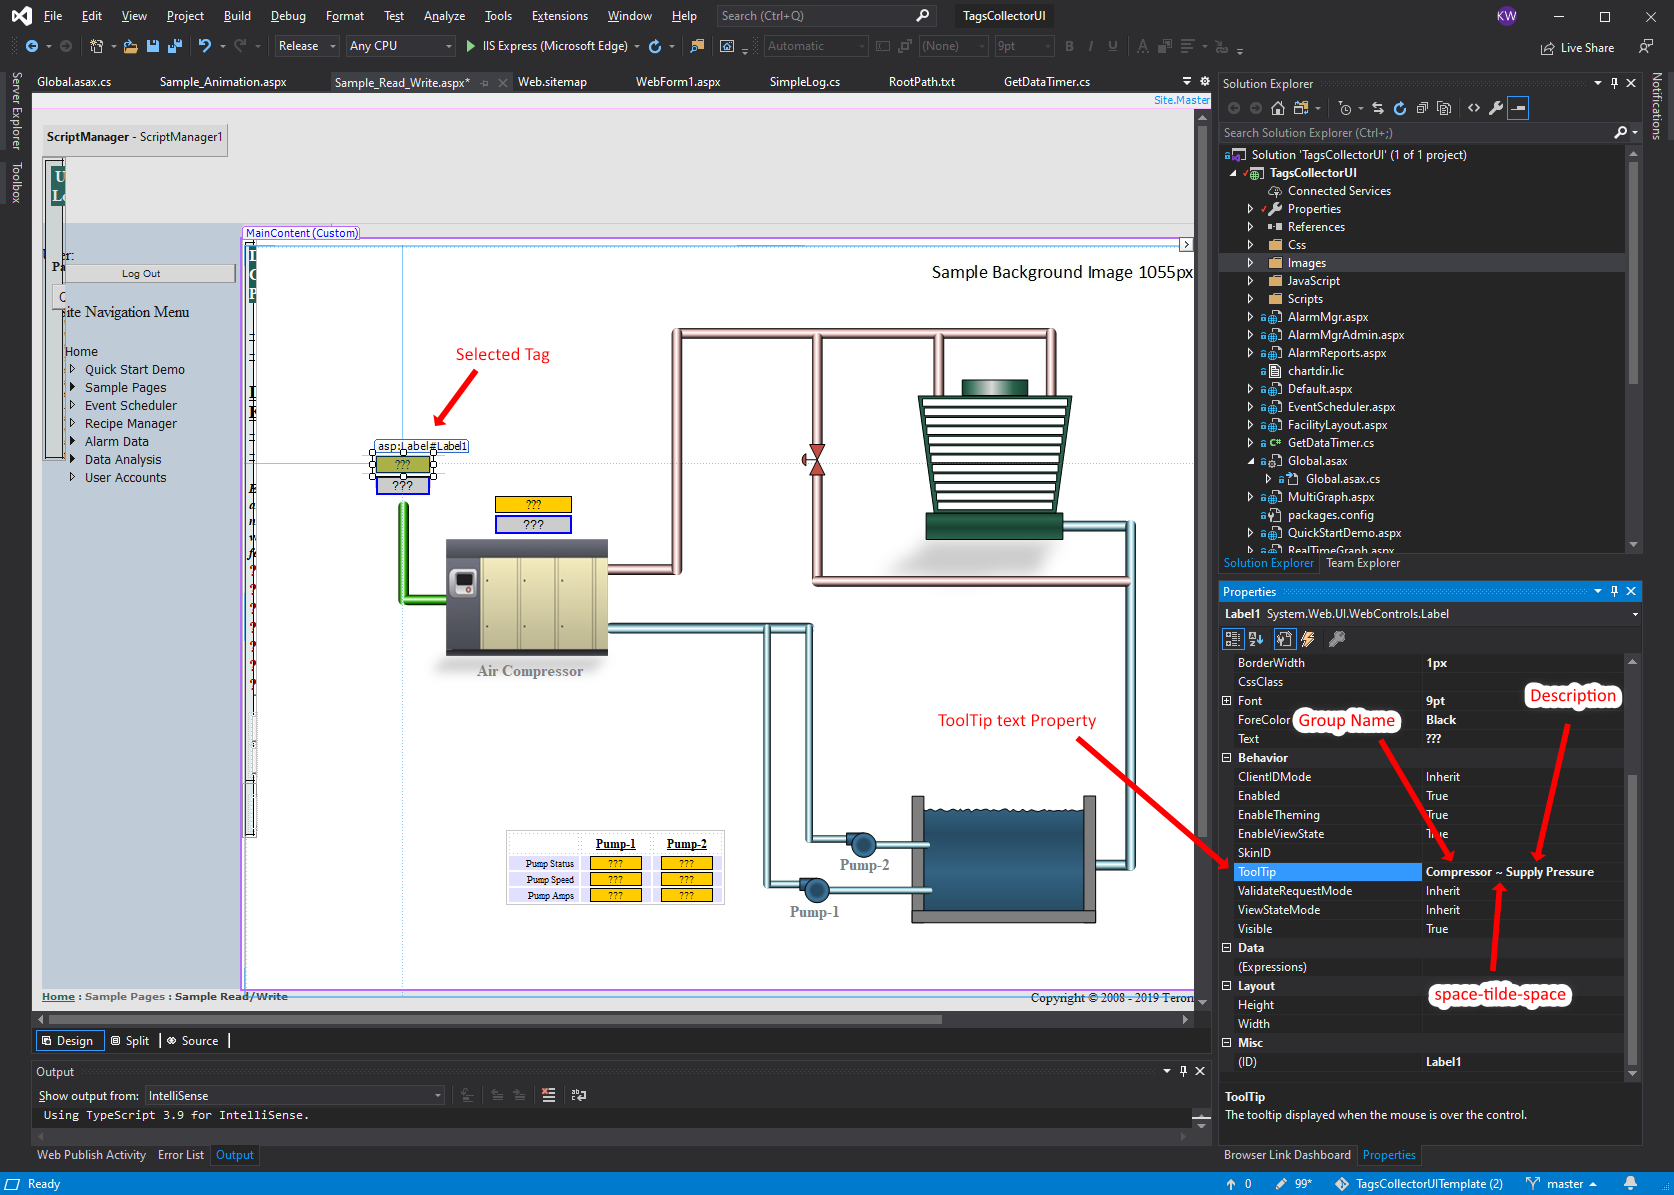
This ToolTip text is the only information required for linking the label to the data.
By using the ToolTip text for linking the data and making the tag name irrelevant, it becomes impossible to insert a tool-tip-text that doesn’t match the data being displayed.
Continue adding, modifying, and deleting display tags as needed to make the page look as intended.
If you would like to utilize the table from the sample page, you can right click on the existing table and insert, modify, or delete rows and columns as desired. The only difference between tags added to the desktop and tags added to the table is that the absolute position values required for the desktop tags will need to be removed if the tag is placed inside of a table.
6. Replace, Add, or Delete the read/write data tags.
The process for working with read/write data tags is exactly the same as with the read-only data tags, except there will need to be a click-event added to the source code for triggering the code behind needed for collecting information from the user and sending data back to TagsCollector.
As was done in the previous section, start by replacing the ToolTip text value with a tag from your project’s TagsCollector database. However, before a read/write tag can function the tag will first need to be configured inside of TagsCollector. This means that from the TagsCollector Management Console, the associated tag will need to have the “Write Enable” checkbox selected, have minimum/maximum values assigned, and have an operator access level assigned (see Step-3 of the TagsCollector Quick Start).
For sending commands from the UI, there are two different click events that can be utilized; an analogSet_Click” event that will prompt the user to enter a numerical value, or a “digitalSet_Click” event that will prompt the user to make a boolean selection. In the Sample_Read_Write page, there is already one of each tag type inserted on the page; the one with the ToolTip of “Compressor ~ Supply Pressure Setpoint” triggers the analogSet_Click event, and the one with the ToolTip text of “Compressor ~ Start/Stop” triggers the “digitalSet_Click” event.
Below is the source code for each of the two buttons along with the resulting popup box that each one will generate:
… OnClick="AnalogSet_Click" ToolTip="Compressor ~ Supply Pressure Setpoint" />
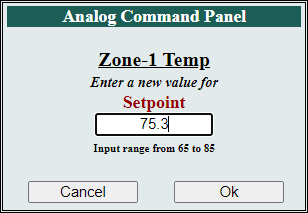
Note that the Analog Control Panel imports the min/ max values from TagsCollector as limits
… OnClick="DigitalSet_Click" ToolTip="Compressor ~ Start/Stop" />
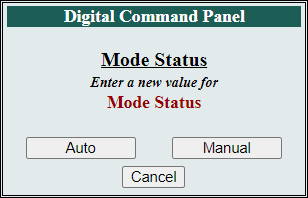
Note that the Digital Control Panel imports the min/ max values from TagsCollector as labels for the boolean commands.
7. Adding new content pages to the site navigation menu
Next add the new page to the site navigation menu by following the examples shown in the UI Site Navigation Menu help section
8. Configure user passwords.
Eliminate or modify default user accounts before installing into a production environment.
9. Build the project and publish the site to the IIS Server
Once the site is complete… the only item remaining is to publish the website to the IIS server. To publish the site from using Visual Studio, select the “Build” dropdown from the top menu and then click on “Publish TagsCollectorUI”. The first time that the site is published, you will need to select a target location for the project, but on subsequent publishes Visual Studio will remember the publishing folder location.
Once the site is published, navigate to the publishing folder… copy the entire contents of the folder… and paste these files into the IIS TagsCollector folder (c:\inetpub\wwwroot\TagsCollector) that we created back in Step-9 of the TagsCollector Quick Start.