Event Scheduler
I. Overview
The Event Scheduler is a scheduling mechanism that can be used for modifying PLC values automatically at specific dates and times. It is ideal for situations where a setpoint is regularly adjusted at different times of the day, days of the week, or months of the year. It can also be used to modify a setpoint once at a specific future date and time. A temperature setpoint, for example, may be different in the winter months versus the summer months. A machine may be set to “manual mode” during business hours and set to “auto mode” all other times. A device that keeps track of monthly statistics may have to be reset every month. The Event Scheduler makes it possible to automate these changes.
II. Adding a new Event Scheduler
Click the Event Scheduler tab near the top of the window and Click the "Add Event Scheduler" button on the bottom of the form
To create a new scheduler, type a descriptive name for the scheduler into the textbox under Scheduler Name.
Next, type the setpoint into the box under Setpoint. The setpoint is the value that will be written to the PLC at the scheduled date and time exactly. Setpoint values can be numerical or Boolean values. Any other values will result in an error.
The Enabled Checkbox must be checked in order to execute the scheduled commands. If a user needs to temporarily disable a schedule, then unchecking this box will inhibit the schedule's operation until re-enabled by the user.
The Gate-Tag allows any boolean tag to be used to automatically enable or disable the schedule based on the condition of the gate signal. E.g. Water the grass everyday at 3:00 PM IF the outside temperature is greater that 80°
To determine what tags are to have the setpoint applied, simply select one or more tags and ADD them to the schedule's list. If more than one tag is added, they will all receive the same setpoint value at the same time when the scheduled event occurs. For different setpoints and/or different times, a separate scheduler must be created for each combination of setpoint and time.
To add a tag, use the two dropdown menus below Tags to select the Group Name and Description, respectively from left to right, and then click [Add]. After [Add] is clicked, the tag specified in the dropdown menus should be displayed in the box directly below the Clear/Remove/Add buttons.
III. Setting the Time
The time of the scheduled event can be specified by setting the hour and minute dropdown menus, respectively from left to right, in 24-hour time format. The time will be the exact hour and minute the setpoint value gets written to each PLC corresponding to the Tags on the list.
Be careful when selecting a time that falls within the range of the DST change. If an event occurs on a Sunday between 2:00AM and 2:59AM, the event will be missed on the day the clocks are moved forward for Daylight Saving Time. Similarly, if the scheduled time is between 1:00AM and 1:59AM on Sundays, the event will occur twice on the day the clocks are re-adjusted back when Daylight Saving Time ends. Please use discretion when scheduling events that fall between those hours on Sundays.
IV. Frequency Overview
The default frequency will be Once, meaning that the scheduled event will occur only one time on the selected date and time. To change the frequency, select a different radio button on the left according to the desired frequency. Each frequency is described in detail in the following sections.
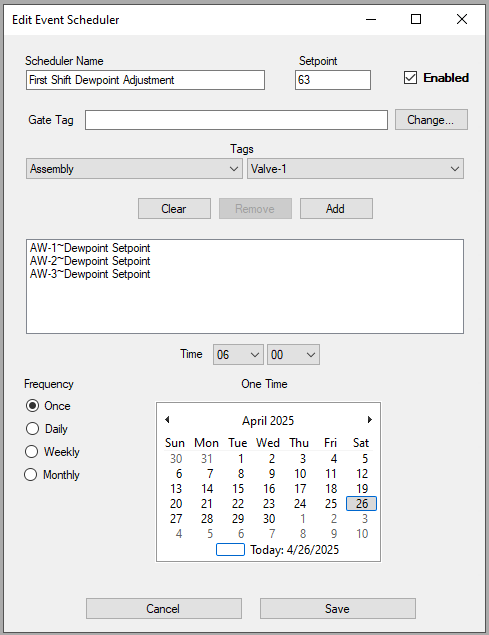
V. Scheduling Single Occurrences
There may be instances where it is necessary to schedule an event for only one occurrence. In this case, the scheduled setpoint will occur only one time on the selected date and time. To schedule a one-time event, select the Once radio button on the left and a calendar will appear. Select the desired date on the calendar. Select the time using the Time drop-down menus.
When you are finished, click [Save] and the new scheduler will be added to the list.

VI. Scheduling Daily Occurrences
An event can be scheduled to occur every day at a specified time. To accomplish this, select the Daily radio button. If the selected time is correct, you are finished. Click [Save] and a new schedule will be created.
VII. Scheduling Weekly Occurrences
Events can be scheduled to occur on certain days of the week. For example, operators in a plant may switch certain PLC’s to “manual mode” when they arrive to the plant, and then back to “auto mode” at the end of the day. It may be desirable to have a PLC return to “auto mode” automatically after business hours end. For this scenario, a weekly schedule is ideal. To create a weekly schedule, select the Weekly radio button and tick the days of the week that the setpoint should be applied. In this case, Monday-Friday are selected. The chosen time is 17:00 (5:00PM) because that is when business hours typically end. The setpoint is “FALSE” because that is the Boolean value that triggers “auto mode” in this case. Presumably, the PLC will remain in “auto mode” over the weekend, so Saturday and Sunday do not need to be included in this schedule.
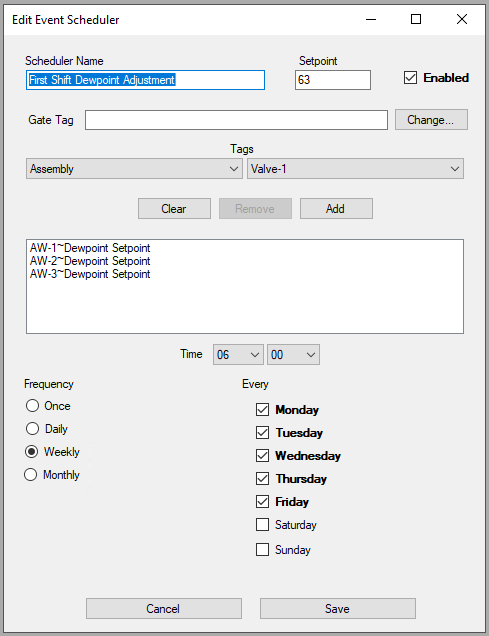
Perhaps it would be convenient to have it automatically switch to “manual mode” at the start of each weekday. This can be done by creating another weekly schedule with a setpoint of “TRUE” (manual mode), with the days and times set to Monday-Friday at 8:00AM (or whenever the plant opens).
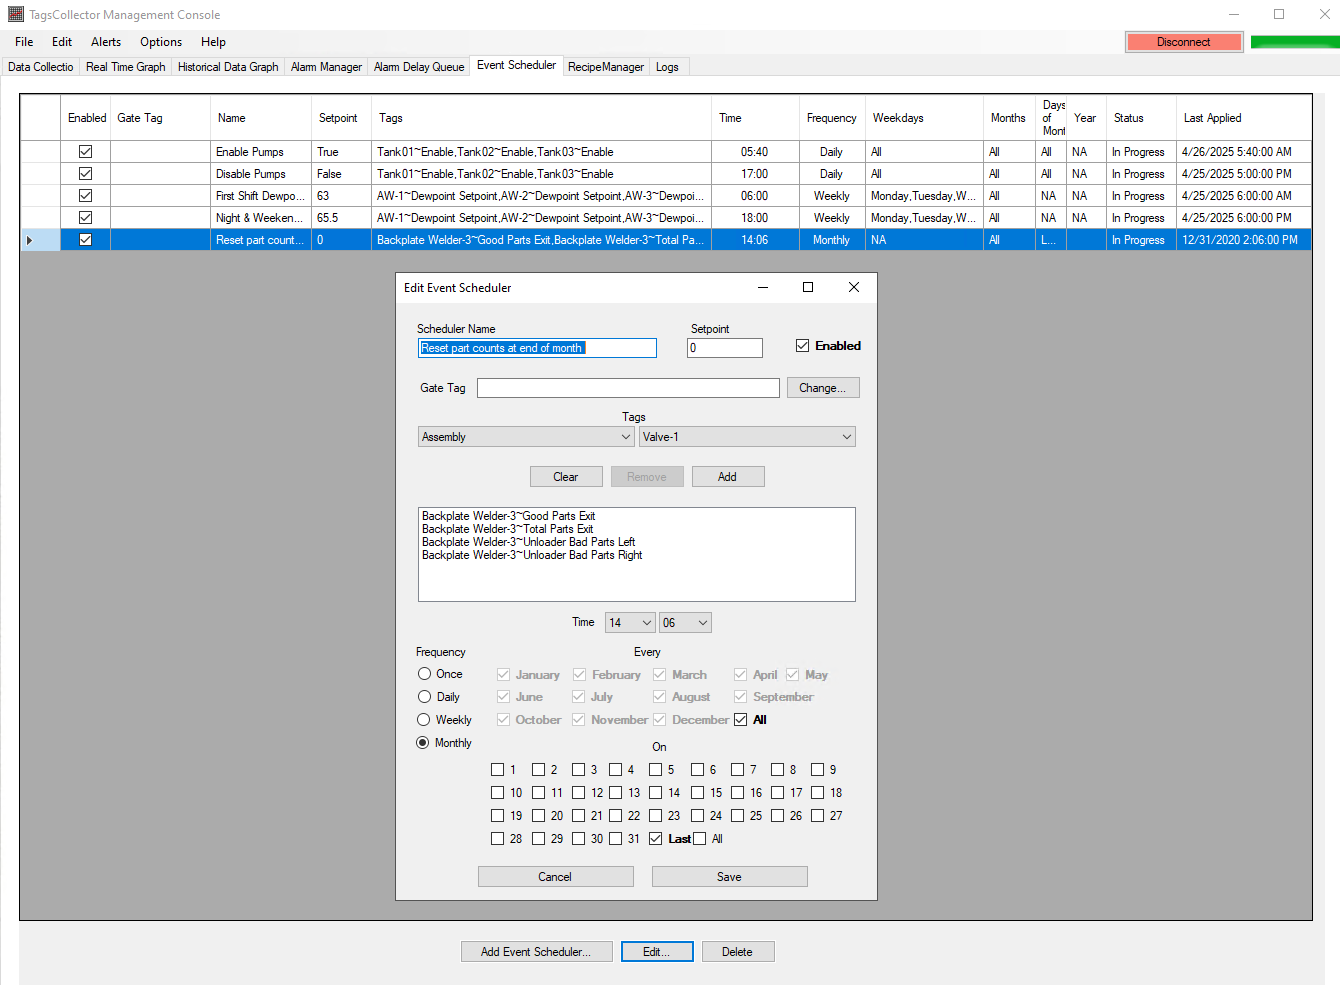
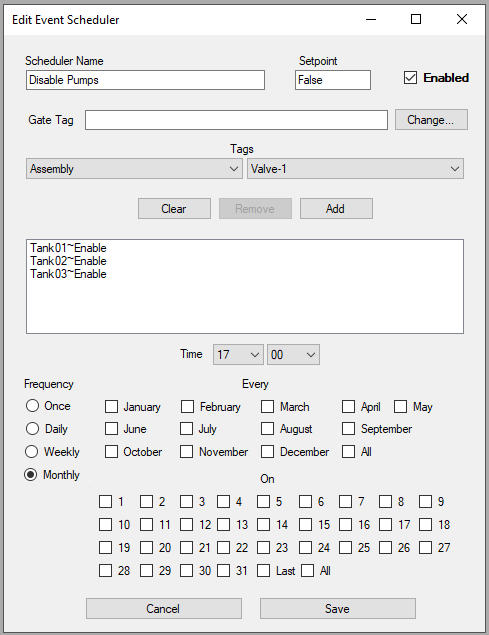
VIII. Scheduling monthly occurrences
Monthly schedules are ideal for occurrences that repeat on specific days of each month or for values that change seasonally. Suppose a PLC keeps track of the Demand Current Month kWh, but it must be manually reset to 0 each month. A schedule could be created to automatically reset the value to 0 on the first day of every month. To easily select all months, tick the All checkbox located in the array of month checkboxes (see below). Below the month checkboxes are numbered checkboxes. These represent the numerical days of the month. Select the appropriate day (or days) of the month to apply the schedule. In this case, it is the first of the month. Click [Save] to finalize the new scheduler.
IX. Scheduler Status & Last Event
The scheduler table displays settings of each scheduler. There are two additional columns labeled Status and Last Applied. The status can be one of three values: “Scheduled”, “In Progress”, or “Complete”. New schedulers will start in “Scheduled” mode. The Last Applied column will initially show “NA”.

After a scheduled event has been run, it will show either show “In Progress” or “Complete” in the Status column. If it is a One-Time occurrence, the Status will be marked as “Complete”.

In all other instances (Daily, Weekly, Monthly), the Status will be marked as “In Progress” after its first run. In every case, the Last Applied column will be updated to reflect the most recent date and time the scheduler was run.**

X. Special Considerations
- The scheduler is limited to the restrictions of the PLC write settings, both in TagsCollector and the PLC itself. A PLC can only be written to if it is write-enabled and the input is valid and within the allowable range.
- Daylight Saving Time can have an adverse effect on schedules that are in the range of 1:00AM-2:59AM on Sundays. Please use caution when setting up recurring events that exist within that time range.
- TagsCollectorService must be running in order for the schedules to be applied. If the Service is not running or the machine is off during the time the event is supposed to occur, it will be skipped until the next time it is scheduled to be applied. If it is a One-Time occurrence, it will not be applied at all and must be re-scheduled manually.
- When selecting a monthly occurrence, if a schedule is to be applied at the end of the month, tick the “Last” checkbox instead of 30/31. The reason is that each month has a different number of days, and if the month does not have the number of days selected, it will be skipped.