START HERE
Welcome to TagsCollector
Use this page as your primary guide for configuring your TagsCollector system. This is a step-by-step guide that is designed to get you up and going quickly.
It is important to complete each step of this process before proceeding to the next.
STEP-1: Preparing the server
Before configuring the server, verify that you system meets the list of System requirements to assure compatibility. For enterprise SCADA applications it is highly advised that you start with a clean install of the Windows operating system.
In order to safeguard the security of the process control equipment, the server should be configured with access to two separate networks. Best practices require that the process control equipment be assigned to a dedicated subnet/VLAN; while the client access (operators and administrators) is assigned to a completely different subnet/VLAN. This configuration allows TagsCollector complete control of the data transfer between the two networks and prohibits users from obtaining direct access to the process control equipment. See Typical System Architecture for more information.
Once the operating system has been installed and the networks are configured you can proceed to step two.
STEP-2: Install and configure TagsCollector
Download the latest install package from www.TagsCollector.com and run the setup.msi file to install the product on the server. For server & enterprise installations select the install for "Everyone" option. Once the application has been installed the product can be registered by following instructions on the screen.
STEP-3: Set a file path for the project data files.
During the installation process TagsCollector creates folder on c: drive called "MyTagDatabase", this is the default location of the database file, but it can be moved or renamed if preferred. Once the location and name have been selected, open the TagsCollector Management Console, left click on the Edit item in the menu, select File Path from the list of dropdown options, and select the collectorData.xml file from your project folder.
STEP-4: Add a device tag and confirm the connection to the process control device
The procedure for adding tags can vary somewhat depending on the device protocol that you are connecting to. For detailed information on the tag connection procedure, select a Data Source from the list of available options and follow the help instructions for that particular device. For initial testing, it is best to select an INT or REAL value that is constantly changing if possible.
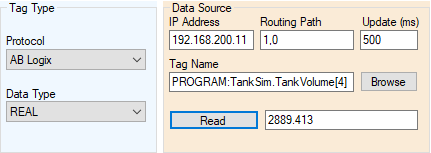
Once the Tag Type and Data Source information has been added, be sure to click the Read button located in the Data Source box and verify that the tag's value is being returned from the field device. If the device is not seen, troubleshoot and resolve the connection before proceeding.
STEP-5: Configure the Tags Display Format
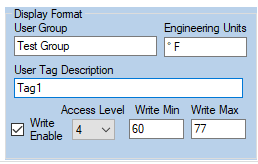
During actual system development the User Group and User Tag Description within the Display Format box can be named anything you like that logically defines the tag. However for initial testing it is best to set the User Group field to Test Group and the User Tag Description to Tag1. These fields are case sensitive and have been predefined in the web-based User Interface sample project that has been provided for testing. Failure to enter them exactly as shown will result in the sample project (found in STEP-9) not finding the tag.
STEP-6: ADD the Tag
Simply click the add button found in the form
STEP-7: Click the Connect Button
Clicking the Connect Button starts the background service. If everything is correct, the tag's "Health" property will be listed as "Good" and the Input Value property will display the value from the PLC.
STEP-8: Install and configure Microsoft IIS
IIS is the Windows web hosting service and it is included as a standard part of the Windows operating system. However before IIS can be used, the feature must be turned on and configured using the Windows Add Roles Wizard. Please read the IIS Configuration information to identify exactly which features need to be included in you IIS setup.
Once IIS has been installed and configured open a web browser on the server and navigate to http://localhost/. If the installation was successful, you should see the default Windows IIS landing page. If the IIS link to the default page can't be seen, troubleshoot the installation to correct the problem before continuing.
Once the above IIC installation is seen to be operational, verify that the server can also be accessed from a remote client. To do this, open a web browser on a client machine and enter the IP address for the server (e.g. http://192.168.40.10). If the IIS link to the default page can't be found, the likely cause is that the server firewall is blocking port 80. Correct the problem and verify operation before continuing.
STEP-9: Publish the User Interface example project
Copy the user interface example project to a folder at the following location C:\inetpub\wwwroot\TagsCollector
STEP-10: Add the Project to IIS
Open IIS Management console and add the TagsCollector website to the list of IIS sites.
STEP-11: Add the Project to IIS
Once again, test the IIS Installation and verify that it's operational and accessible to remote clients (just like was done in Step-8). However, this time the TagsCollector Web Interface should show in place of the default Windows IIS logo. Once this step is completed, you can begin development of your own customized user interface.