Configure Tag Display Format
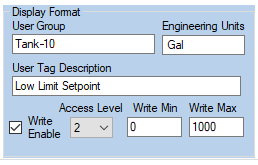
- Enter a User Group for the tag. The User Group is simply any name you chose to help better organize the tags within some type of logical order. Group names are extremely helpful when you have multiple pieces of equipment each with an identical or similar collection of tags. E.g. Machine-1, Machine-2, Machine-3...
- Enter a User Tag Description for the tag. This is simply a label you assign that best identifies the tags data. E.g. Temperature Setpoint, Servo Position, Header Pressure, etc.
Note: The above two items when combined must create a unique identifier for the data. E.g. "Line-103 ~ Servo Position", "Tank-7 ~ Temperature Setpoint", "Chiller-3 ~ Header Pressure", etc.
- Enter the Engineering units that you would like displayed after the data. E.g. °F, %, Amps, Gal, etc. Note that in some situations the engineering units may read better if there is a blank space inserted between the value and the engineering units’ suffix, therefore leading spaces can be inserted here if desired.
- Place a check in the Write Enabled checkbox if you need the ability to write data back out to the tag in the PLC. E.g. setpoints, start/stop commands, etc.
- If the Write Enabled checkbox is selected then select the user Access Level required to write data out to the tags. User access ranges are from 0 (lowest – normally view only) to 5 (highest – no restrictions).
- If the Write Enabled checkbox is selected then enter a minimum limit for data written out to the PLC. If an operator tries to command a tag to a value lower than this limit then the command will be rejected. For Bool tags this should be set to False.
- If the Write Enabled checkbox is selected then enter a maximum limit for data written out to the PLC. If an operator tries to command a tag to a value higher than this limit then the command will be rejected. For Bool tags this should be set to True.