AB Logix Series
For Allen Bradley Logix controllers
- Open the TagsCollector Editor and select the Data Collection tab from the top of the page.
- In the data entry section at the bottom of the page, locate the Protocol drop down box in the Tag Type section and select AB Logix from the list of available options.
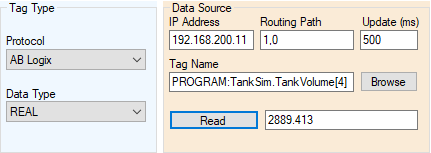
- Enter the IP address for the controller you would like to access
- Enter the Routing Path for the CPU where the tag resides. The routing path is comprised of the backplane number (always 1) and the slot number of where the CPU is located separated by a comma. The most common routing path is 1,0
- Next, you will need to either enter the Tag Name. To do this you can either type in the tag name that you want to access (the name must be entered EXACTLY as it is in the PLC) OR if the controller is connected and online, you can simply click the Browse button and select the tag directly from the controller's online tag database.
Note: If a tag is selected using the Browse function then the Data Type of the tag will automatically be selected. However, if the tag name is manually entered then Data Type of that tag must also be manually entered.
- Verify that the Data Type of the tag added matched the data type in the PLC.
- Enter an Update time that is desired for the tag. See the Tag Update Time section for additional help in selecting optimum update times while reducing system overhead.
- Once the tag name has been entered, click the Read button to verify operation and see the current value of the tag.